| .. | ||
| charts | ||
| templates | ||
| .helmignore | ||
| Chart.yaml | ||
| README.md | ||
| values.yaml | ||
Grafana OnCall Helm Chart
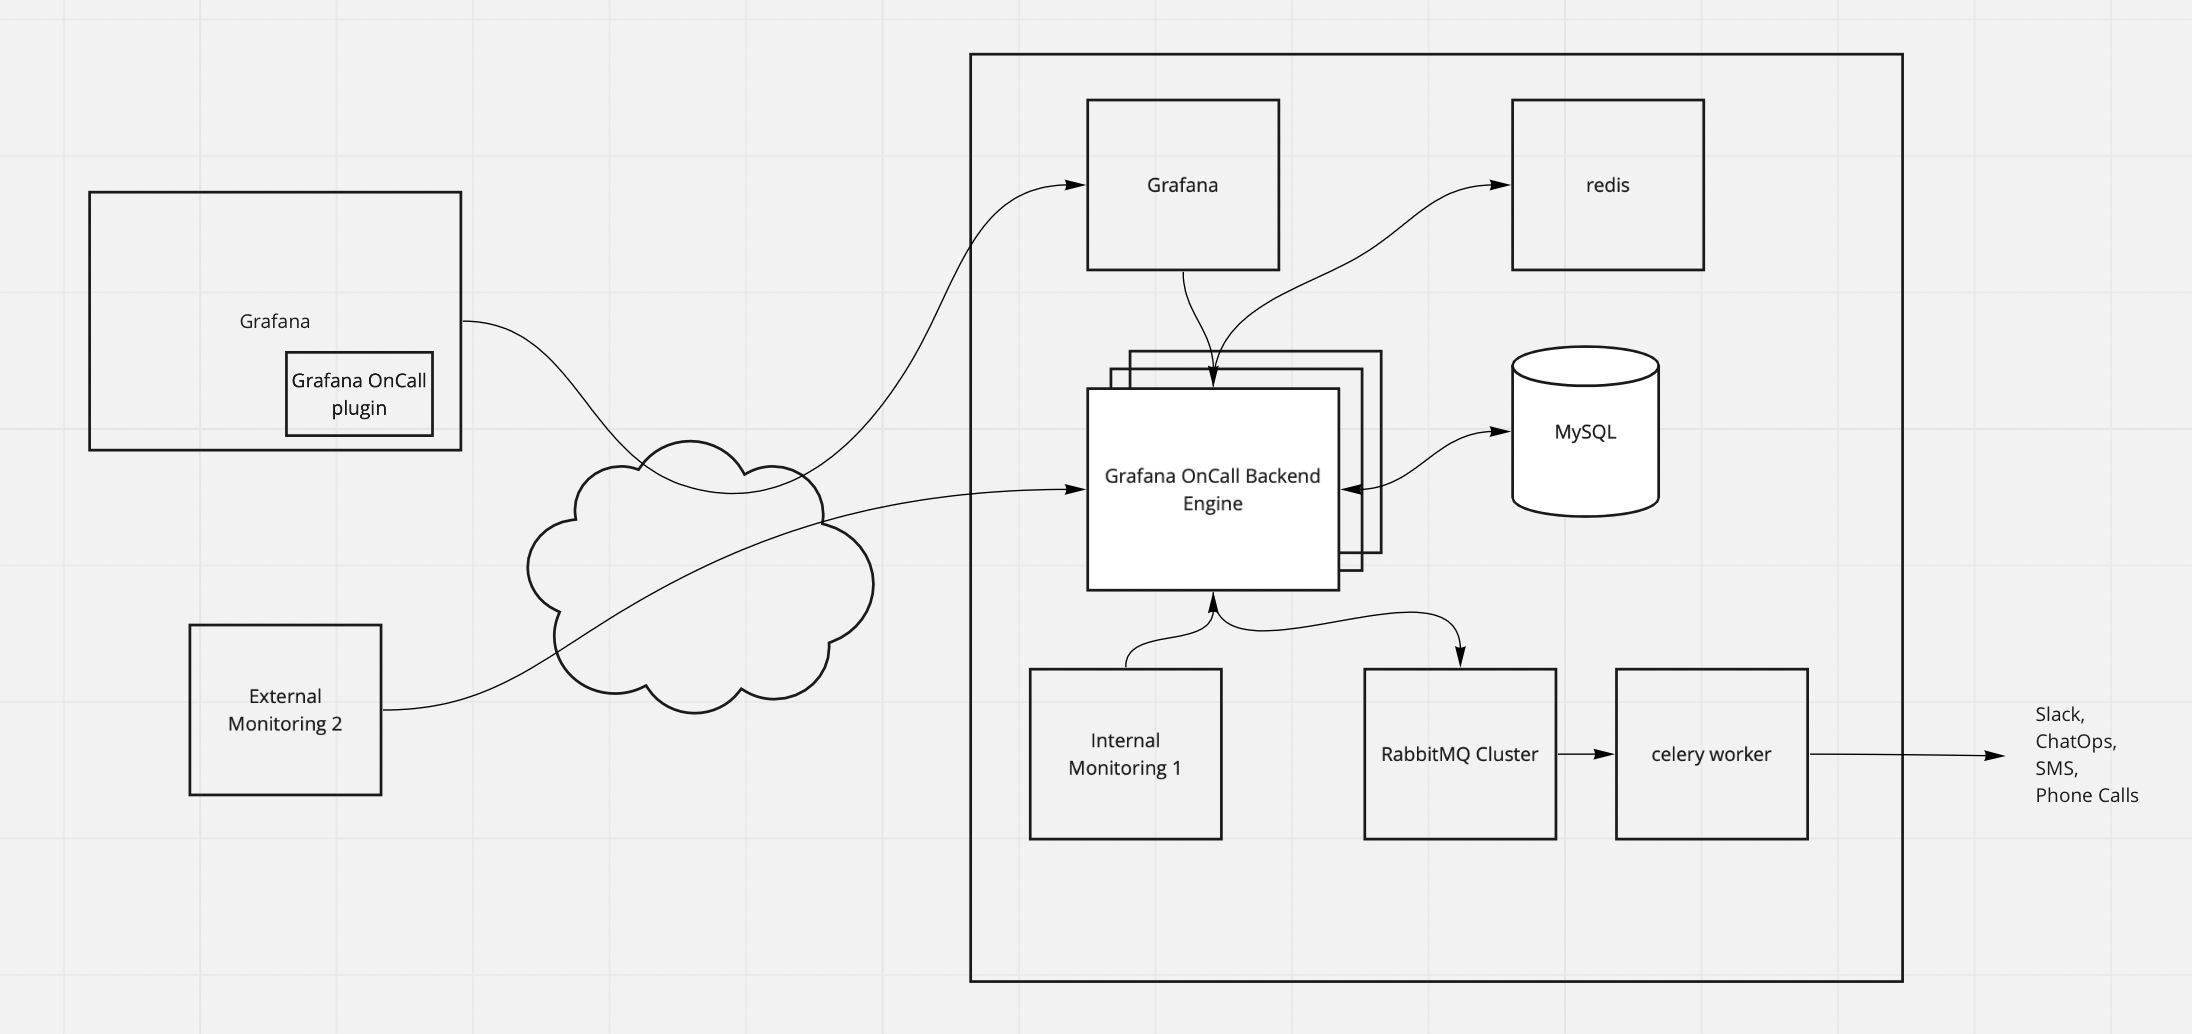
This Grafana OnCall Chart is the best way to operate Grafana OnCall on Kubernetes. It will deploy Grafana OnCall engine and celery workers, along with RabbitMQ cluster, Redis Cluster, and MySQL 5.7 database. It will also deploy cert manager and nginx ingress controller, as Grafana OnCall backend might need to be externally available to receive alerts from other monitoring systems. Grafana OnCall engine acts as a backend and can be connected to the Grafana frontend plugin named Grafana OnCall. Architecture diagram can be found here
Default helm chart configuration is not intended for production. The helm chart includes all the services into a single release, which is not recommended for production usage. It is recommended to run stateful services such as MySQL and RabbitMQ separately from this release or use managed PaaS solutions. It will significantly reduce the overhead of managing them
Cluster requirements
- ensure you can run x86-64/amd64 workloads. arm64 architecture is currently not supported
- kubernetes version 1.25+ is not supported, if cert-manager is enabled
Install
Prepare the repo
# Add the repository
helm repo add grafana https://grafana.github.io/helm-charts
helm repo update
Installing the helm chart
# Install the chart
helm install \
    --wait \
    --set base_url=example.com \
    --set grafana."grafana\.ini".server.domain=example.com \
    release-oncall \
    grafana/oncall
Follow the helm install output to finish setting up Grafana OnCall backend and Grafana OnCall frontend plugin e.g.
👋 Your Grafana OnCall instance has been successfully deployed

  ❗ Set up a DNS record for your domain (use A Record and  "@" to point a root domain to the IP address)
     Get the external IP address by running the following commands and point example.com to it:

        kubectl get ingress release-oncall -o jsonpath="{.status.loadBalancer.ingress[0].ip}"

     Wait until the dns record got propagated.
        NOTE: Check with the following command: nslookup example.com
              Try reaching https://example.com/ready/ from the browser, make sure it is not cached locally

  🦎 Grafana was installed as a part of this helm release. Open https://example.com/grafana/plugins/grafana-oncall-app
     The User is admin
     Get password by running this command:

        kubectl get secret --namespace default release-oncall-grafana -o jsonpath="{.data.admin-password}" | base64 --decode ; echo

  🔗 Connect Grafana OnCall Plugin to Grafana OnCall backend:

     Issue the one-time token to connect Grafana OnCall backend and Grafana OnCall plugin by running these commands:

        export POD_NAME=$(kubectl get pods --namespace default -l "app.kubernetes.io/name=oncall,app.kubernetes.io/instance=release-oncall,app.kubernetes.io/component=engine" -o jsonpath="{.items[0].metadata.name}")
        kubectl exec -it $POD_NAME -- bash -c "python manage.py issue_invite_for_the_frontend --override"

     Fill the Grafana OnCall Backend URL:

          http://release-oncall-engine:8080

     Fill the Grafana URL:

          http://release-oncall-grafana

🎉🎉🎉  Done! 🎉🎉🎉
Configuration
You can edit values.yml to make changes to the helm chart configuration and re-deploy the release with the following command:
helm upgrade \
    --install \
    --wait \
    --set base_url=example.com \
    --set grafana."grafana\.ini".server.domain=example.com \
    release-oncall \
    grafana/oncall
Set up external access
Grafana OnCall can be connected to the external monitoring systems or grafana deployed to the other cluster.
Nginx Ingress Controller and Cert Manager charts are included in the helm chart with the default configuration.
If you set the DNS A Record pointing to the external IP address of the installation with the Hostname matching base_url parameter, https will be automatically set up. If grafana is enabled in the chart values, it will also be available on https://<base_url>/grafana/. See the details in helm install output.
To use a different ingress controller or tls certificate management system, set the following values to false and edit ingress settings
ingress-nginx:
  enabled: false

cert-manager:
  enabled: false

ingress:
  enabled: true
  annotations:
    kubernetes.io/ingress.class: "nginx"
    cert-manager.io/issuer: "letsencrypt-prod"
Connect external MySQL
It is recommended to use the managed MySQL 5.7 database provided by your cloud provider Make sure to create the database with the following parameters before installing this chart
CREATE DATABASE oncall CHARACTER SET utf8mb4 COLLATE utf8mb4_unicode_ci;
To use an external MySQL instance set mysql.enabled to false and configure the externalMysql parameters.
mariadb:
  enabled: true

# Make sure to create the database with the following parameters:
# CREATE DATABASE oncall CHARACTER SET utf8mb4 COLLATE utf8mb4_unicode_ci;
externalMysql:
  host:
  port:
  db_name:
  user:
  password:
Connect external RabbitMQ
Option 1. Install RabbitMQ separately into the cluster using the official documentation Option 2. Use managed solution such as CloudAMPQ
To use an external RabbitMQ instance set rabbitmq.enabled to false and configure the externalRabbitmq parameters.
rabbitmq:
  enabled: false  # Disable the RabbitMQ dependency from the release

externalRabbitmq:
  host:
  port:
  user:
  password:
Uninstall
Uninstalling the helm chart
helm delete release-oncall
Clean up PVC's
kubectl delete pvc data-release-oncall-mariadb-0 data-release-oncall-rabbitmq-0 \
redis-data-release-oncall-redis-master-0 redis-data-release-oncall-redis-replicas-0 \
redis-data-release-oncall-redis-replicas-1 redis-data-release-oncall-redis-replicas-2
Clean up secrets
kubectl delete secrets certificate-tls release-oncall-cert-manager-webhook-ca release-oncall-ingress-nginx-admission